Saturday 16 March 2013

Inspiration

I'm always a little embarrassed when asked the question "Where do you get your inspiration?" because I know the expected answer is anything other than "Everywhere!" or "Dunno.".

The truth is, I rarely know where my ideas for beads come from.  I tend to sit at the torch with a handful of colours that I like, start playing and wait to see what happens.

I'm constantly revisiting Design Seeds for colour ideas (I'm subscribed to their feed so I don't miss anything!) but more often or not I grab a glass rod or two at random and just start to play.

There has been at one notable exception though.  Like many people, I have an account on Pinterest, partly because I like pretty pictures but mostly because I find it easier to find items I want to bookmark for future reference by scanning a page of pictures rather than by a text list.

I came across a few pictures of rocks and caves, eroded and shaped by the wind in Antelope Canyon, Arizona:
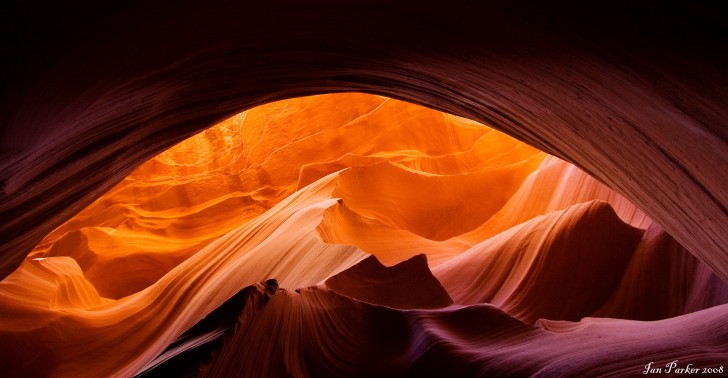
Credit: Ian Parker
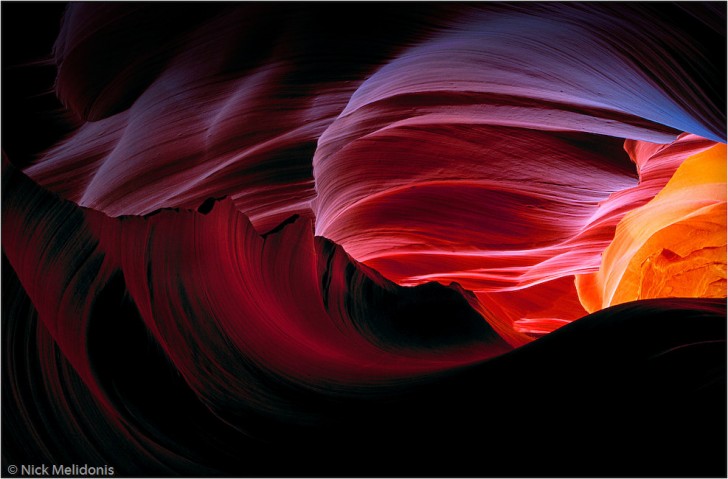
Credit: Nick Melidonis
Credit: Andrea Peckl

"Ooh, nice colours!" I thought.  Then "It looks a bit like etched glass.".

Ting!

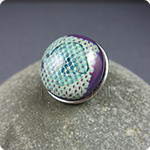
For the first time ever, a real piece of inspiration!  I even knew exactly which colours to use.  The next time I was at my torch I tried them and it all worked first time; Arizona Ombré was born:


In case you're wondering what it looked like before it was etched...


I think it's nice enough, but I do prefer the etched version.  It seems to highlight the graduated colours more.

Still, as far as being able to put my finger on inspiration, that's the only example I have!  I can't be the only person who seems to grab their inspiration out of thin air... can I?

Sunday 17 February 2013

Showing off your poppers

Poppers, snaps, chunks, whatever you call them, they're pretty popular amongst the lampwork community, not to mention their customers and have become highly collectable.  I have a modest selection of them, some of which are in my Etsy shop:


Most people wear them on leather bracelets but there are also other ways to wear them as I'm about to show you.  I've stayed within Etsy for all of these otherwise I could have been here all day, cutting and pasting links!  So without further ado, I'll start with....


Wear them on your wrist...


There are plenty of fantastic designs of popper bracelets out there, not just in leather but in other materials too:

Leather "Mangopop" Bracelets from Mangobeads
Leather popper bracelets from RASPBERRYRINGS
Leather popper bracelet from AtelierZilverglas
Leather bracelet by MadelineBunyan

I'd like to add here that I bought one of Madeline's bracelets to match with one of my Dragon's Eye poppers and they went together wonderfully!

Dragon's Eye popper by janehamill on leather bracelet by MadelineBunyan

Which leads me onto two of my own bracelet designs:

"Quattro" leather cuff bracelet by janehamill
"Circles" suede cuff bracelet by janehamill

And now for more bracelets in different materials:

"abaco" adjustable bangle by mizgeorge
Etched Purple Copper Cuff by blueberribeads
Silvertone metal bracelet by JustMade


Wear them on your fingers...


Sterling Silver ring by EnchantedCobwebs
Ring by BeadTreasures4You


Wear them on your ears...


And finally, wear them in your own creations!


Until I did some searching for things to include in this post, I didn't know someone had made a popper component that you could use in your own piece of jewellery!

Pendant or component by BeadTreasures4You

So there you have it, plenty of ways to show off your poppers!  Not a comprehensive list but certainly enough to be getting on with.  Do you know more that should be included here?  Or do you know of any distinctive popper jewellery designs outside of Etsy?  Let me know in the comments box - I'm happy to share the links with the world!

Saturday 9 February 2013

February Giveaway - we have a winner!

Apologies for not posting this sooner. I drew the name of the winner of my giveaway at 8pm last night as promised and then had trouble publishing a post to my blog to announce it. I did post the result on my Facebook page though so at least I managed to let some of you know :)

The winner of the draw was Linda from Earthshine.co.uk - congratulations Linda! Your prize will be in the post to you ASAP.

Thank you so much to everyone who entered the competition and for all the lovely comments you left both here and on Facebook. I hope to be back in the workshop soon to make more shiny things for you to include in your beady creations.

I know what you're really wondering is "When is she going to hold another giveaway?" ;) Well, I'll feel like celebrating once I get back to the workshop... and if you check out the "likes" on my Facebook page, you'll see I'm not all that from from 1000 followers (yes, really!). Maybe we'll have a double celebration on our hands...

Friday 1 February 2013

February Giveaway

At the beginning of January, my Facebook page had reached 900+ likes and to celebrate I promised I'd hold a glassy giveaway.

Well, better late than never, eh? :)

So here's the prize - one of my signature Rainbow Tie-Dye art glass beads in the shape of a heart, hung on a sterling silver snake chain. Either keep it as a gift for yourself or give it to someone special on Valentine's Day!

It doesn't matter where you are in the world - this giveaway is open to international entries.

To enter, all you have to do is comment on this post. I don't require you to "like" my Facebook page (Facebook does not look kindly on that sort of thing) but I'd appreciate it if you did and would be kind enough to share it with your friends :) It'd be great if you could follow my blog too - that way you'll know when the next glassy giveaway is happening...

I will put all the names in a randomiser app and will use it to choose the winner at 8pm on Friday 8th February. The winner will be announced here and on my Facebook page. Good luck!

Edited to add: Some people have had problems posting below and I know some would prefer not to, so if you'd like to leave a comment on my Facebook page, under my post about this giveaway or  under a photo I posted of this pendant I'll add you to the list - thanks!

9th Feb Update: The winner has been announced

Saturday 7 July 2012

A little something for myself

I'm usually so busy trying to keep both my Etsy and my own webshop stocked that I forget that I took up lampworking as a relaxing hobby!  Making something for myself, just for the heck of it has become a rare occurrence, so over the past few weeks, on and off, I've been working on a little project for myself.  It's something that I've had in mind for a good while...

Here's the result!

Rainbow Necklace

I'm really pleased with it :)

Now I know what you're thinking; it shouldn't have taken me so long to put together something with relatively simple beads.  You see, I'm obsessive about colour and order.  The beads had to be made in exactly the right shades, ensuring a smooth gradient through the spectrum.  Then there's the size - for this to turn out the way I'd pictured it, the beads had to be a uniform size... but I've never been great with sizing beads.  It's why I don't make many sets - I usually have to make twice as many beads as end up in the finished set, just to get consistent sizes!

I thought that this project might give me a chance to practice and gradually get the hang of evenly-sized beads but try as I might, it just wouldn't happen.  I knew I'd have to give in and use a bead roller.  I do prefer shaping glass by hand (well, not exactly "by hand" - that'd hurt!  You know what I mean :) ) but in this case I realised it wasn't going to happen.

Boy am I glad I did give in!  After taking some advice from a friend, I bought a bead roller from Howaco Glass (who offer a very friendly, personal and quick service), waited a few days for it to arrive, sat and looked at it for a couple more days (I often do this with a new piece of kit... like I'm letting it settle in before bothering it) and finally gave it a go.

The result was I made my necklace in two days with only one attempt per colour!  Each bead is about 16.5mm in diameter and 9.5mm hole-to-hole.

I now have lots of similar ideas branching from this one.  I'm currently working on an etched version as well as other necklaces, bracelets and bead sets in similar gradient style but limited to "palettes" (hot reds and oranges, cool greens and blues, etc.).  I'm going to try different sizes and shapes too.

The positive side-effect of making this piece is that I've started having ideas again just as "beadmaker's block" was setting in. 

Now I just have to work out what to do with all the beads I made before I invested in the bead roller...

ALL the beads!


Friday 1 June 2012

Pricing puzzler

My question:  How do you price a bead like this?

Rainbow Kaleidoscope


I'd joked that I was going to name it "Two And A Half Hours And A Burnt Hand" which pretty much sums up what it took to make this piece.  Anyone familiar with my work knows I'm a bit partial to rainbows... in this case, I decided to use *all* the colours; the result was that it took 2½ hours to carefully melt the layers whilst making sure the disc didn't melt down or become too wibbly.  At the end, I was so tired that I became careless and forgot that the end of glass rod that's fresh out of the flame is HOT!

Top view;  keeping the disc thin and straight whilst
melting down each layer was particularly tricky!

My problem is that now I've made a bead with which I'm rather chuffed, how do I price it in such a way that I'm covering not only my time but the skill involved in making it?  I don't intend to charge extra for the burn as that was my own silly fault ;)

Advice and suggestions appreciated...

Tuesday 20 March 2012

A new line for a new (glass) year

This week, I finally manage to make it to the workshop for the first time this year and I chose to start with something new - interchangeable ring toppers. I was pretty pleased with my first attempts:

My first ring toppers


And here's the second batch (one has already sold to a lovely person :) ):

Second batch of ring toppers


If you don't know about interchangeable jewellery systems, this is how they work:

Ring with interchangeable topper


The great thing is that you only have to buy one ring base (pendants and cufflinks are available too) and you can switch the topper to suit your outfit!

Bases are available from Little Castle Designs (sterling silver or stainless steel) and from by george (sterling silver only and the ring bases here are adjustable).

Watch my Etsy shop for new topper designs.